
As we continue our exploration of robust cybersecurity solutions with Orlox, today’s focus shifts to the practical steps involved in deploying Microsoft Defender for Identity. This powerful tool is essential for protecting the sensitive identity layers within Active Directory environments against sophisticated cyber threats.
In this installment we delve into the specifics of setting up and securing your systems with Microsoft Defender for Identity. From understanding pre-requisites and creating service accounts to the actual installation of the sensor, each step is crucial for a successful deployment.
Requirements
Before we can start implementing Microsoft Defender For Identity, we need to make sure we have all requirements. As every environment is different, I suggest visiting the following Microsoft page to validate the specific requirements for your environment. To verify if all requirements are met, you can validate your machines using this script.
Creating A Service Account
To make a connection with Active Directory a service account is required. I highly recommend using a Group Managed Service account over a regular service account for running any services with elevated permissions.
Even though a Group Managed Service Account (gMSA) and a regular service account, both used in Windows Server environments, serve similar purposes, they differ significantly in terms of management and security features.
Where a regular service account is a user account created specifically to provide a security context for services running on Windows Server and for which Administrators manually set and update the account’s password posing security risks, such as being vulnerable to brute force attacks if the password is weak or if it becomes known, a gMSA offers automated password management, where the password is controlled and regularly changed automatically by the domain controller, without any administrator intervention.
This ensures a high level of security as the passwords are complex and changed frequently, significantly reducing the risk of unauthorized access due to password compromise. Additionally, while a regular service account operates on a single server, a gMSA can be used across multiple servers, providing a streamlined and consistent identity for services running on a server farm or in a load-balanced environment.
To validate if your environment is capable of using gMSA, run the following command
Get-KDSRootKeyIf you don’t get a value in return, execute the following command to generate a KDS root key
Add-KdsRootKey -EffectiveImmediately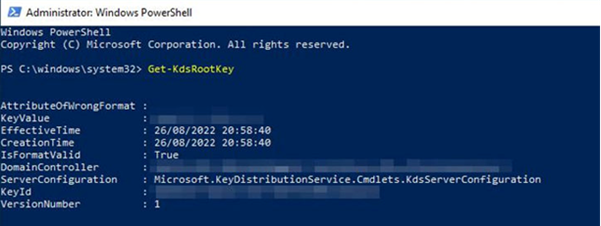
By adding the -EffectiveImmediately parameter, the Domain Controller will use the KDS Root Key straight away. Other domain controllers need to wait until replication is completed.
# Set the variables:
$MangedServiceAccountName = 'gmsa_dfi'
$DFI_HostsGroup = 'dfi_hostnames'
$DFI_Hosts = 'DC1', 'DC2', 'ADFS1'

# Import the Active Directory Module
Import-Module ActiveDirectory

# Create a group to scope the gmsa permissions
$gMSA_HostsGroup = New-ADGroup -Name $DFI_HostsGroup -GroupScope Global -PassThru
$DFI_Hosts | ForEach-Object { Get-ADComputer -Identity $_ } |
    ForEach-Object { Add-ADGroupMember -Identity $DFI_HostsGroup -Members $_ }

# Create the Managed Service Account
New-ADServiceAccount -Name $MangedServiceAccountName -DNSHostName "$MangedServiceAccountName.$env:USERDNSDOMAIN" –Description "Microsoft Defender for Identity service account" –KerberosEncryptionType AES256 `
-PrincipalsAllowedToRetrieveManagedPassword $DFI_HostsGroup
To create the group Managed Service Account, you can use the following code snippet:
Housekeeping reminder: Don’t forget to move the group and the account to the correct location in Active Directory
Now that we have created the group Managed Service Account, we need to grant the account the correct permissions, goal is to limit the permissions to match the exact need.
As the gMSA requires read-only permissions on the Deleted Objects Container, we need to enable the Active Directory Recycle Bin functionality if not already active. To do so, execute the following PowerShell command.
Enable-ADOptionalFeature -Identity 'Recycle Bin Feature' -Scope ForestOrConfigurationSet -Target (Get-ADDomain).DNSRoot -Confirm:$falseWith all prerequisites completed, execute the following script to assign the correct permissions to the gMSA.
$Identity = 'TESTLAB\gmsa_dfi'
$distinguishedName = ([adsi]'').distinguishedName.Value
$deletedObjectsDN = 'CN=Deleted Objects,{0}' -f $distinguishedName
$params = @("$deletedObjectsDN", '/takeOwnership')
C:\Windows\System32\dsacls.exe $params
$params = @("$deletedObjectsDN", '/G', "$($Identity):LCRP")
C:\Windows\System32\dsacls.exe $params
To complete the installation, log on to each server and install the gMSA by running the following command
Import-Module ActiveDirectory
Install-ADServiceAccount -Identity 'gmsa_dfi'
You might receive an error message when executing the above command. To resolve this issue, you can throw away your Kerberos token
klist purge -li 0x3e7Deploying The Microsoft Defender For Identity Sensor
Before we can start installing the Microsoft Defender For Identity sensor, we need to download the sensor from the Microsoft Defender XDR portal.
Navigate to Settings -> Identities
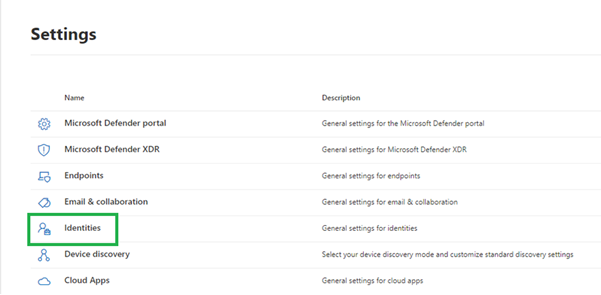
Select Sensors and press the Add Sensor button. On the right hand side a pop-up will appear where you can download the sensor and you will find a generated access key
The random generated access key is only used during installation. If you regenerate the key, this will not impact any existing installations.
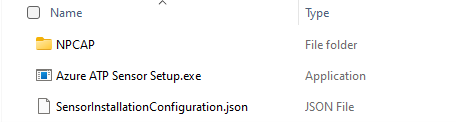
The downloaded zip file contains the following items:
- The Defender for Identity sensor
- The Configuration file
- The NCAP OEM Version 1.0
Conclusion
Successfully deploying Microsoft Defender for Identity is a detailed process that requires careful attention to setup and configuration. By following the steps outlined today, organizations can effectively lay down a strong foundation for their identity security strategy.
Remember, the integration of such systems into your security architecture not only enhances your defensive posture but also streamlines your security operations. For those seeking expert assistance in implementing Microsoft Defender for Identity or other cybersecurity solutions, Orlox is here to help. Reach out to us for detailed guidance and support to ensure your deployment is seamless and secure. Stay proactive in your cybersecurity efforts and safeguard your organization against the ever-evolving landscape of threats.